Category C
Machines with 5,5 mm stitch width, without IDT™ system
expression™ 2014
tiptronic™ 6112, 6110, 2020, 2010
select™ 2.2, 2.0, 1528, 1526, 1520
hobby™ 4260, 4250, 4240
Category D
Machines with 5,5 mm and 6 mm stitch width, and IDT™ system
select™ 4.2, 4.0, 3.2, 3.0,
select™ 1548, 1546, 1540, 1538, 1536, 1530 (5,5 mm)
tiptronic™ 6270, 6250, 6232, 6230,
tiptronic™ 6152, 6150, 6122, 6120 (5,5/6 mm)
stretch & jeans™ 6091 (6 mm)
freestyle™ 1527, 1522
Category E
Machines with 6 mm stitch width, and IDT™ system
creative™ 2124
quilt expression™ 2046, 2044, 2042
expression™ 2036, 2034, 2028, 2026, 2024
classicstyle™ 2029, 2027, 2025, 2023
tiptronic™ 2040, 2030, 2020, 2010
Category F
Machines with 9 mm stitch width,
without IDT™ system
creative™ 7560
Category G
Machines with 9 mm stitch width, and IDT™ system
creative™ 2170 , 2144, 2140, 2134
creative™ 7570, 7562, 7550, 7530
performance™ 2058, 2056, 2054
quilt expression™ 2048
expression™ 2038
Category J
Machines with 9 mm stitch width, and IDT™ system
creative sensation™ pro II
creative sensation™ pro
creative sensation™
creative vision™
creative performance™
creative™ 4.5, 4.0, 3.0, 2.0
performance™ 5.0, 5.2
quilt expression™ 4.2, 4.0, 720
expression™ 3.5, 3.2, 3.0, 2.0
expression™ 150, 710
Category K
Machines with 7 mm stitch width, and IDT™ system
creative™ 1.5
quilt ambition™ 2.0, 630
ambition™ 1.0, 1.5, 155
ambition™ 610, 620
ambition essential™
passport™ 2.0, 3.0
Machines with 6 mm stitch width
SMARTER BY PFAFF™ 260c,160s,140s
Category L
Machines with 9 mm stitch width, and IDT™ system
creative icon™ 2
creative icon™
performance icon™
Specifications
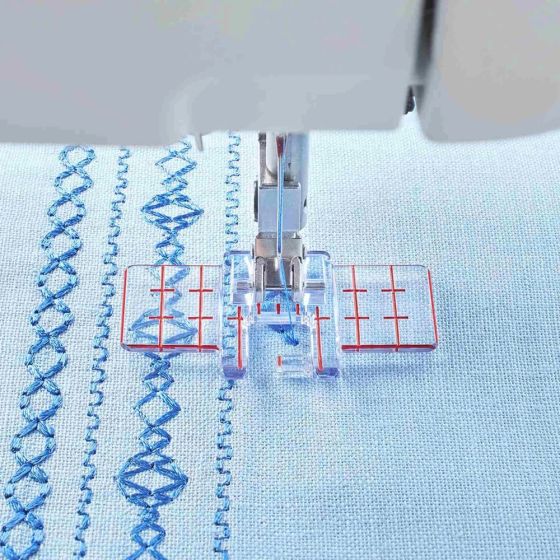
Decorative Borders:
- Disengage the IDT™ system.
- Snap on the Multi-Line Decorative Foot.
- Select a decorative stitch.
- Mark a line on the fabric where the center of the stitching will be.
- Place Tear-Away stabilizer under the fabric.
- Place the fabric under the presser foot, aligning the red center mark on the foot with the line on your fabric.
- Sew the first row of decorative stitching.
- Choose another decorative stitch or continue on with the same stitch.
- Move your fabric to the left. Decide the distance you'd like to have between the rows.
- Use the red horizontal lines to match up the starting point of each row.
- Sew the new line of stitching using the red vertical lines on the foot as a guide while sewing.
- Move the fabric and sew another row of decorative stitching to the left of center.
- Continue with more stitches as desired to create a wider border.
- Remove the stabilizer.
Maxi Stitches:
- Disengage the IDT™ system.
- Snap on the Multi-Line Decorative Foot.
- Select a Maxi stitch.
- To ensure a straight line of stitching, draw a line on the fabric where the center of the stitching will be. Continue to mark one or two lines on each side of the center line.
- Place Tear-Away stabilizer under the fabric.
- Sew carefully, letting the machine control the feeding.
- Keep the marked lines and the vertical red lines on both sides of the presser foot parallel to each other when sewing.
- Remove the stabilizer.